To do kettlebell swings with proper form, hinge at your hips, keep your spine neutral, hike the kettlebell between your legs, and drive it forward with your hips rather than lifting it with your arms. The kettlebell should float to about chest height while your body finishes tall, braced, and balanced.
The swing is a power exercise, so technique matters more than speed or load. This guide will help you prepare your space, learn the hip hinge, perform each repetition, recognize form problems, and choose sensible next steps. For additional exercise education, you can compare this movement with dumbbell Romanian deadlifts, which train a slower version of the same hip-hinge pattern.
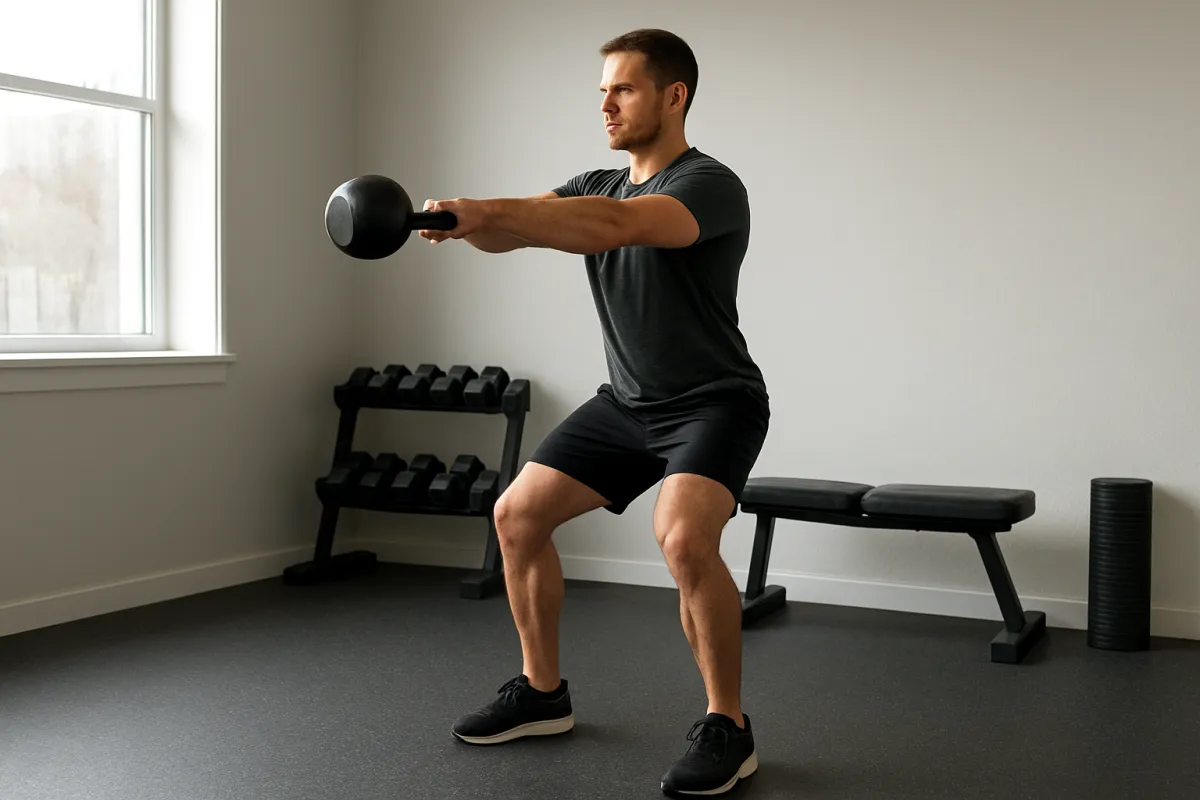
1. Prepare your equipment, space, and body
Choose a kettlebell that you can control without gripping it excessively or changing your posture. Beginners should prioritize a manageable weight that allows clean practice; the exact load depends on your strength, training history, and the quality of the kettlebell handle.
Use a clear, non-slip area with enough room to swing the weight forward and safely set it down. Keep children, pets, furniture, and loose mats away from the movement path. A short general warm-up can include brisk walking, bodyweight hinges, glute bridges, and a few controlled squats. General exercise safety guidance also recommends warming up before more demanding activity; see the NHS injury-prevention guidance for broader preparation advice.
- Wear stable shoes that do not compress or slide easily.
- Check that the handle is dry and easy to grip.
- Place the kettlebell on the floor in front of you, not directly between your feet.
- Have enough space to stop and place the weight down without twisting.
Checkpoint before you begin
You should be able to perform five slow hip hinges without rounding your lower back or feeling sharp pain. If you cannot, practice the hinge before adding a dynamic swing.
2. Learn the hip hinge before lifting the kettlebell
A kettlebell swing is primarily a hip-hinge movement, not a deep squat. Stand with your feet roughly shoulder-width apart, soften your knees, and push your hips backward as your torso inclines forward. Your shins should remain fairly vertical while your hips move behind you.
Keep your ribs stacked over your pelvis, your neck in line with your spine, and your weight distributed through the whole foot. Imagine closing a car door behind you with your hips. This teaches the glutes and hamstrings to load while your back stays steady.
For a useful comparison, the same basic hinge appears in other posterior-chain exercises such as the best glute exercises for home training. The difference is that the swing adds speed and momentum, so you must first own the slower pattern.
3. Set up for the first repetition
Place the kettlebell about one foot in front of you. Stand behind it with your feet slightly wider than hip-width apart and turn your toes out only as much as feels natural.
Hinge down, reach forward with both hands, and grip the handle firmly. Pull your shoulders away from your ears, brace your midsection, and tilt the kettlebell slightly toward you. Your arms should be long, and your back should remain neutral rather than rounded.
Before beginning the swing, create tension by pulling the kettlebell slightly toward your body. This prepares the hike pass and prevents you from trying to lift the weight straight up from the floor.
| What to look for | Warning sign | Correction |
|---|---|---|
| Feet stable and pressure through the whole foot | Heels lift or toes grip the floor | Reduce the load and slow the setup |
| Neutral spine and relaxed neck | Lower back rounds or chin juts forward | Practice unloaded hinges and brace gently |
| Bell starts in front of you | Bell begins too close to your feet | Move it slightly forward before hiking |
| Arms stay long | Elbows bend before hip drive | Think of your arms as connecting ropes |
4. Perform the kettlebell swing step by step
Step 1: Hike the kettlebell back
From the setup, hike the kettlebell backward between your thighs as if passing a football. Keep it high in the upper-inner thigh area rather than letting it drop toward your knees. Your torso should hinge, and your arms should remain connected to your ribcage.
Step 2: Drive with your hips
As the kettlebell reaches the end of the backswing, forcefully extend your hips and knees. Squeeze your glutes and stand tall. The power comes from the lower body; your arms guide the kettlebell but should not curl, raise, or muscle it upward.
Step 3: Let the bell float
Allow the kettlebell to travel forward to approximately chest height. At the top, your body should form a straight line from your feet through your hips and shoulders. Keep your abs engaged, avoid leaning backward, and let the handle point naturally rather than forcing a wrist position.
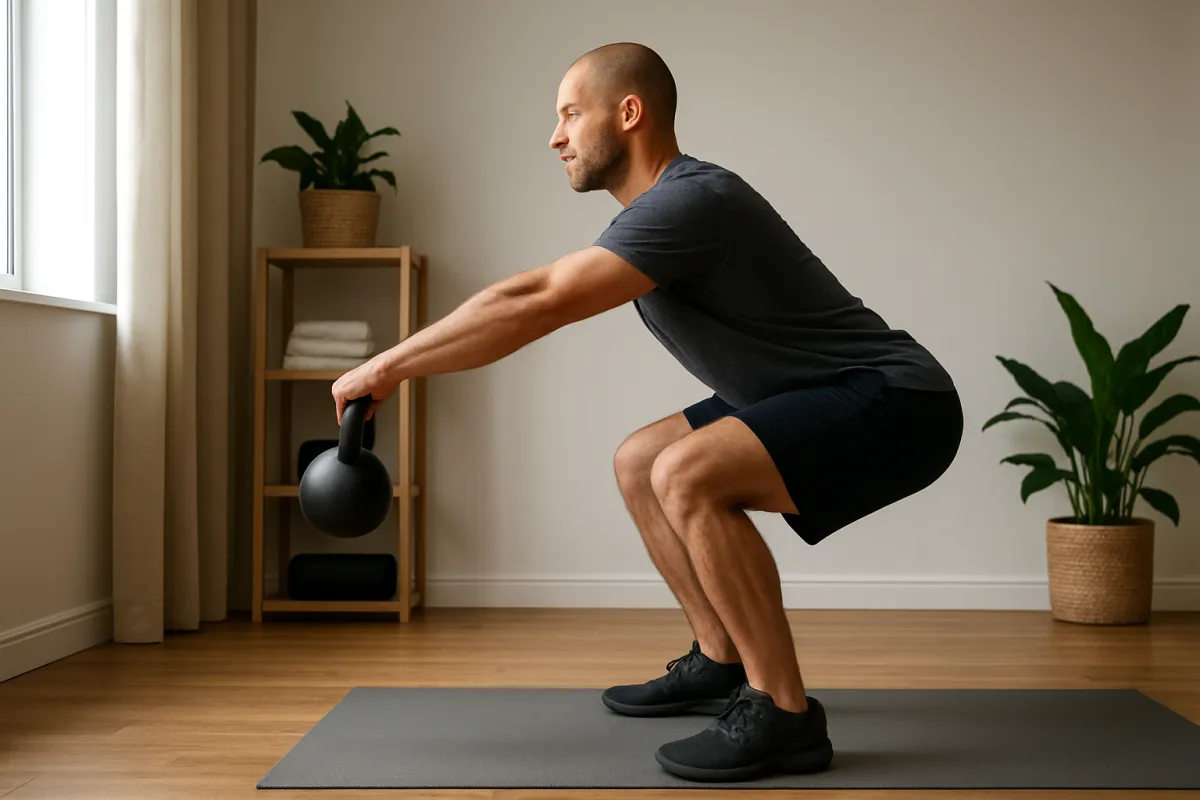
Step 4: Receive the downswing
As the kettlebell begins to fall, wait for it to pass your hips before hinging backward. Push your hips behind you and allow the bell to return between your legs. Do not squat under the weight or reach your arms toward the floor.
Step 5: Finish the set safely
To stop, guide the kettlebell forward and let it settle on the floor in front of you. Do not abruptly drop it behind you, twist while holding it, or place it down while your spine is rounded.
5. Use breathing, rhythm, and sensible volume
Use a short, forceful exhale during the hip drive and inhale as the kettlebell travels back. The breathing should support the brace without making you hold your breath for the entire set.
Practice short sets with full control, such as five to ten repetitions followed by a rest. You can gradually add repetitions or sets when every rep looks and feels similar. If the swing becomes a conditioning exercise, maintain the same technical standard instead of chasing a faster pace.
The American Council on Exercise kettlebell guidance describes the swing as an explosive hip-hinge pattern. That distinction is useful: intensity should come from coordinated hip extension, not from rushing the movement or lifting with the shoulders.
6. Fix the most common kettlebell swing mistakes
- Squatting instead of hinging: Push your hips farther back and keep your shins more vertical.
- Lifting with the arms: Relax the shoulders and focus on snapping the hips forward.
- Overextending at the top: Finish tall with glutes tight, but do not lean backward.
- Letting the bell travel too low: Keep the backswing compact and high between the thighs.
- Rounding the back: Reduce the weight, improve the hinge, and stop when you lose your neutral position.
- Starting too close to the bell: Move it forward so the first hike has room.
- Using a loose grip: Hold the handle securely while avoiding unnecessary forearm tension.
7. Safety checks and troubleshooting
You should feel the glutes, hamstrings, hips, and core working. Mild muscular fatigue is expected, but sharp pain, numbness, unusual weakness, dizziness, or pain that changes your movement is a reason to stop.
What if your lower back feels the swing?
Check whether you are squatting, overextending at the top, or allowing the bell to drift too far away. Return to unloaded hinges or dead-stop practice swings. If back pain persists, worsens, or follows an injury, seek advice from a qualified healthcare professional before continuing.
What if you cannot control the backswing?
Use a lighter kettlebell and reduce the range of motion. You can also practice kettlebell deadlifts, hip hinges, and glute bridges before returning to dynamic swings.
What if your grip fails first?
Shorten the set, rest longer, and avoid swinging a weight that forces you to squeeze continuously. Grip fatigue can make the handle move unpredictably and compromise the rest of your technique.
8. Advanced tips and useful progressions
Record a side-view video from a safe distance to check whether the bell stays close, your spine remains neutral, and your hips—not your shoulders—create the movement. Another useful drill is the dead-stop swing: place the bell down after each repetition, reset your hinge, and rebuild tension before the next rep.
Once two-handed swings are consistent, you can explore one-handed swings or interval formats. Progress only one variable at a time: load, repetitions, density, or variation. If your goal is home strength training, combine swings with controlled exercises such as split squats or Romanian deadlifts rather than using swings as your only lower-body movement.
9. Quick kettlebell swing checklist
- Clear, non-slip space and a dry handle.
- Feet stable, knees softly bent, hips ready to hinge.
- Spine neutral and core lightly braced.
- Kettlebell hikes between the thighs, not straight down.
- Hips create the power; arms guide the bell.
- Top position is tall and balanced, without leaning back.
- Breathing stays controlled.
- Every repetition looks repeatable.
10. Your next actions
Start with five unloaded hip hinges, then perform a few kettlebell deadlifts to rehearse the setup. Next, try two or three short sets of controlled two-handed swings with plenty of rest. Stop before fatigue changes your posture.
After your session, note which checkpoint needs the most work: hinge depth, backswing control, hip drive, breathing, or grip. Build the next workout around that single priority. When you can repeat the movement without pain and without technical breakdown, increase training gradually rather than jumping to a much heavier kettlebell.
Learning how to do kettlebell swings with proper form comes down to one decision: use the heaviest weight and fastest pace that you can control while preserving a strong hip hinge, neutral spine, and balanced finish. If those qualities disappear, reduce the load or return to the preparation drills.